Author – Gauri Pawse, Cloud Engineer
Most self-service BI tools don’t include a data warehouse or data lake. Although they will integrate with data warehouses or data lakes that are built by data professionals, they don’t let analysts and business users perform data warehousing tasks in tools that are designed for them. This is where data Flows come into picture.
Introduction:
Data flows are a capability in Power BI that allow users to build reusable data sets called entities, and build them using a familiar Power Query user experience. A data flow is a collection of entities (tables) that are created and managed in workspace in the Power BI service. One can add and edit entities in their data flow, as well as manage data refresh schedules, directly from the workspace in which the data flow was created. Data flow stores the data in the Azure Data Lake storage
If you don’t have an account in Azure or you don’t have a subscription that you can use for Azure Data Lake, No need to worry! You can still use Data flow. Data flow manages the Data Lake configurations internally. You won’t need anything except your Power BI accounts and subscriptions. But if someone has their own Azure subscription and prefer to manage the storage method in the Data Lake themselves. There are methods that they can work with Data flows and configure their own Azure Data Lake to be the storage engine.
You cannot believe there are such great benefits of using a data flow :
- It eliminates the ETL Layer, isn’t it great! one can apply transformations in the cloud itself.
- Create data flow once in the cloud (i.e. Power BI service) and use it frequently.
- Includes an incremental refresh feature that handles a huge amount of data.
- Easy import when connecting to Power BI desktop
Let’s check what are prerequisites :
- Power BI pro/premium license
- source dataset
Let us check how to connect create a data flow using Create new entity in Power BI service and importing to a Power BI desktop file
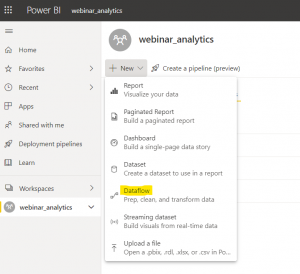
Step 1: Login into Power BI service, under workspace select New, create data flows.
Step 2 : Select add new entities
Step 3 : Select any source with which you want to create a data flow. Here we are selecting Azure SQL Database
Step 4 : Add connection settings and select next
Step 5 : In this step, you can check the tables which are present in the Adventure Works DB. Select any table you want to transform and select related tables, it will automatically select those tables which are related to original table and click on next.
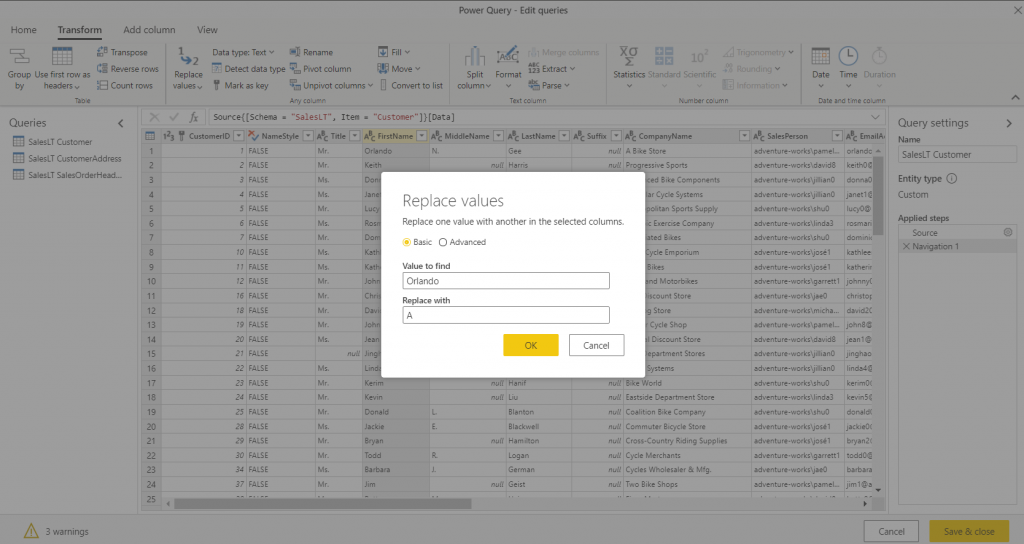
Step 6 : You will be now directed to transform query tab, where you can perform different transformations on the table. Here we have selected to perform replace value on a column. Click OK, save & close.
Step 7 : Your data flow has been created, you can see the tables which we had selected. One can apply incremental refresh if needed on the data set
Step 8 : The data flow which is created at Power BI service can also be imported into a desktop pbix file.
Data flows are very much easy to implement, isn’t it !


