Author – Pranjal M. Rele, Associate Cloud Engineer
Problem Statement:
How to perform database encryption using Azure Key Vault?
Introduction:
Backup Encryption: Encrypted backup is one of the easiest to use, most secure tools you can use to protect yourself. Encrypting a file essentially translates the file’s data into a secret language. Encrypting backups gives you personal control over your personal information. It’s a level of protection that goes way beyond an email password.
for example. If your iPhone gets stolen or you leave your computer or iPad on an airplane, your information is locked securely with the password only you know
Azure Key Vault: Azure Key Vault is a cloud service that provides a secure store for secrets. You can securely store keys, passwords, certificates, and other secrets.
Azure Key Vault helps solve following problems:
Secrets Management –
Azure Key Vault can be used to Securely store and tightly control access to tokens, passwords, certificates, API keys, and other secrets.
Key Management –
Azure Key Vault makes it easy to create and control the encryption keys used to encrypt your data.
Certificate Management –
Azure Key Vault is also a service that lets you easily provision, manage, and deploy public and private Transport Layer Security/Secure Sockets Layer (TLS/SSL) certificates for use with Azure and your internal connected resources.
Store secrets backed by Hardware Security Modules –
The secrets, keys, and certificates at store are encrypted either with software key (Standard tier) or FIPS 140-2 Level 2 validated HSMs key (Premium tier)
In this article, you install and configure the SQL Server Connector for Azure Key Vault.
Prerequisites:
Before you begin using Azure Key Vault with your SQL Server instance, be sure that you’ve met the following prerequisites:
1. Azure Subscription.
2. SQL Server Management Studio.
3. SQL Server Connector (To be installed later when required).
Steps:
Step 1: Set up an Azure AD Service Principal.
To grant your SQL Server instance access permissions to your Azure key vault, you need a service principal account in Azure AD.
1. Sign in to the Azure portal, and Select the Azure Active Directory button.

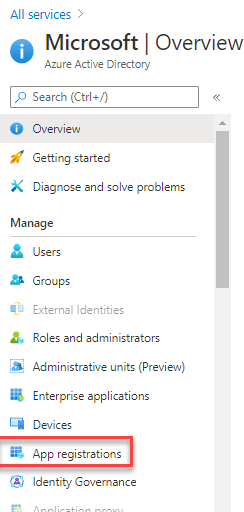
2. On the Azure Active Directory Overview pane, select App registrations.
Register an application with Azure Active Directory by doing the following.
- On the App registrations pane, select New registration.
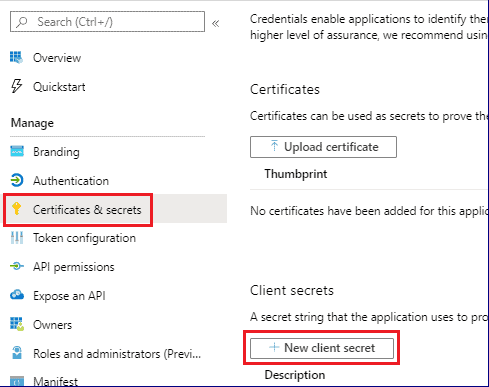
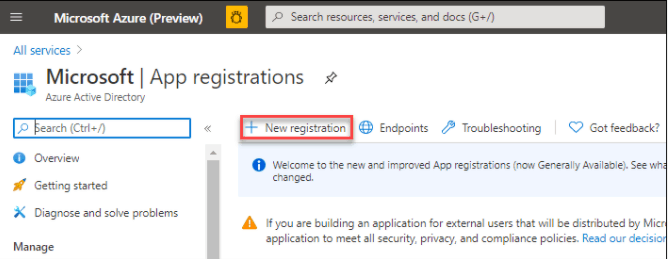 4. On the Register an application pane, enter the user-facing name for the app, and then select Register. In the left pane, select Certificates & secrets, and then select New client secret.
5. Under Add a client secret, enter a description and an appropriate expiration, and then select Add.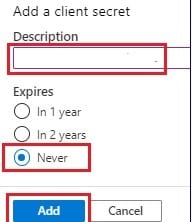
6. On the Certificates & secrets pane, under “Value”, select the Copy button next to the value of the client secret to be used to create an asymmetric key in SQL Server.
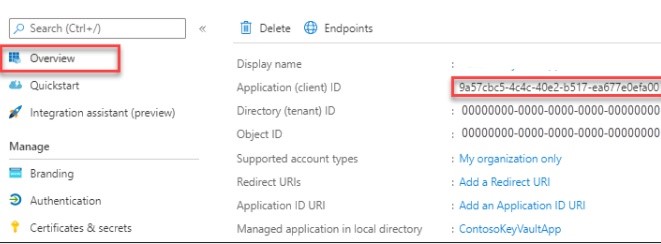
7. In the left pane, select Overview and then, in the Application (client) ID box, copy the value to be used to create an asymmetric key in SQL Server.
Step 2: Create a Key Vault.
Create a Key Vault by using Azure Portal. You can use the Azure portal to create the key vault and then add an Azure AD principal to it.
1. Create a Resource Group.
2. Create a Key Vault.
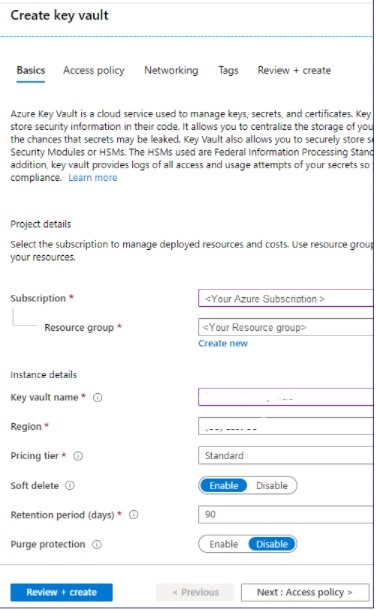
On the Create key vault pane, select the Basics tab, enter the appropriate values, and then select Review + create.
- On the Access policies pane, select Add Access Policy.
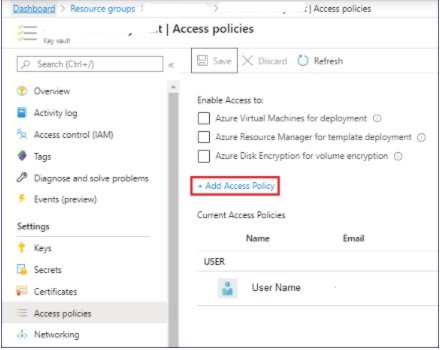
- On the Add access policy pane, do the following:
a. In the Configure from template (optional) drop-down list, select Key Management.
b. In the left pane, select the Key permissions tab, and then verify the Get, List, Unwrap Key, and Wrap Key check boxes are selected.
c. Select Add.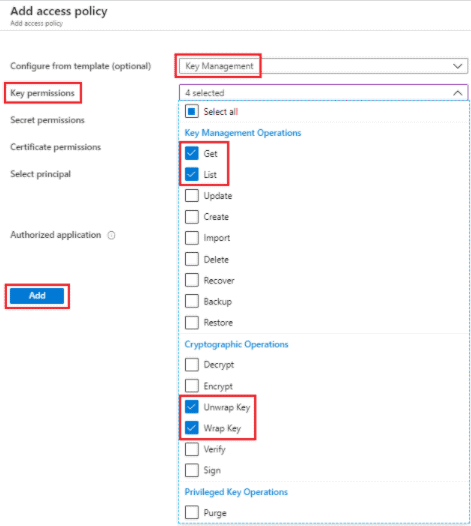
- In the left pane, select the Select principal tab, and then do the following:
a. In the Principal pane, under Select, start typing the name of your Azure AD application, and then, in the results list, select the application you want to add.
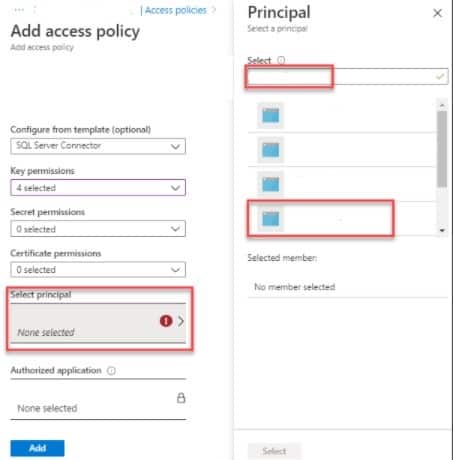
- Select the Select button to add the principal to your key vault.
c. At the lower left, select Add to save your changes. - On the Key Vault pane, select Keys and enter a key vault name. Use key type RSA and RSA Key Size 2048. Set activation and expiration dates as appropriate and set Enabled? as Yes.

- On the Access policies pane, select Save.
Step 3: Install the SQL Server Connector.
Download the SQL Server Connector from the Microsoft Download Center. The download should be done by the administrator of the SQL Server computer.
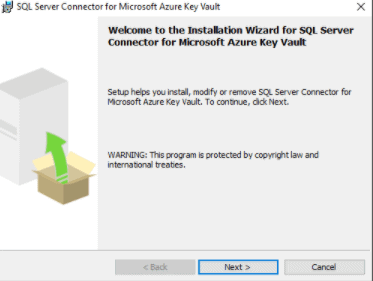
Step 4: Configure SQL Server.
1. Open SQL Server Management Studio.
2. Configure SQL Server to use EKM by running the following Transact-SQL script:
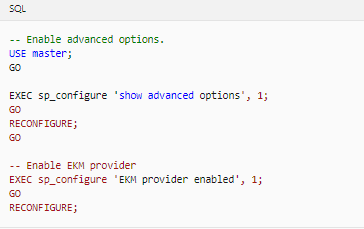
- Register the SQL Server Connector as an EKM provider with SQL Server.
Create a cryptographic provider by using the SQL Server Connector, which is an EKM provider for the Azure key vault. In this example, the provider name is AzureKeyVault_EKM.CREATE CRYPTOGRAPHIC PROVIDER AzureKeyVault_EKM
FROM FILE = ‘C:\Program Files\SQL Server Connector for Microsoft Azure Key Vault\Microsoft.AzureKeyVaultService.EKM.dll’; GO - Set up a SQL Server credential for a SQL Server login to use the key vault.
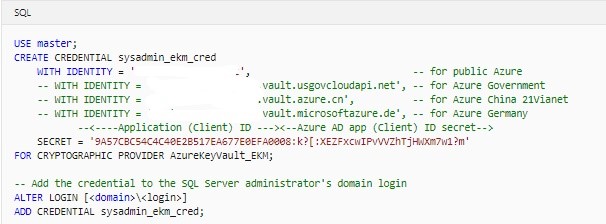
Modify this above Transact-SQL script in the following ways:
- Edit the IDENTITY argument to point to your Azure key vault.
- If you’re using global Azure, replace the IDENTITY argument with the name of your Azure key vault from Step 2: Create a key vault.
- If you’re using a private Azure cloud(for example, Azure Government, Azure China 21Vianet, or Azure Germany), replace the IDENTITY argument with the Vault URI that’s returned in step 3.
- Replace the first part of the SECRET argument with the Azure Active Directory Client ID from Step 1: Set up an Azure AD service principal. In this example, the Client ID is 9A57CBC54C4C40E2B517EA677E0EFA00.
Important
Be sure to remove the hyphens from the App (Client) ID.
- Complete the second part of the SECRET argument with Client Secret from Step 1: Set up an Azure AD service principal. In this example, the Client Secret is 08:k?[:XEZFxcwIPvVVZhTjHWXm7w1?m. The final string for the SECRET argument will be a long sequence of letters and numbers, without hyphens.5. Open your Azure key vault key in your SQL Server instance.
Whether you created a new key or imported an asymmetric key, as described in Step 2: Create a key vault, you will need to open the key. Open it by providing your key name in the following Transact-SQL script.Replace EKMSampleASYKey with the name you’d like the key to have in SQL Server.
Replace ContosoRSAKey0 with the name of your key in your Azure key vault. 6. Create a new login by using the asymmetric key in SQL Server that you created in the preceding step.
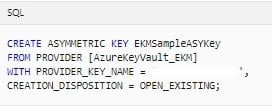
7. Create a new login from the asymmetric key in SQL Server. Drop the credential mapping from Step 4 Configure SQL Server so that the credentials can be mapped to the new login.8. Alter the new login and map the EKM credentials to the new login.
9. Restore a database that will be encrypted with the Azure Key Vault.
Simply in the Object Explorer pane, right-click on the database and select Restore.
And, Select the .bak file to be restored and complete the process correctly.
OR You can also create a new database.10. Create a database encryption key by using the ASYMMETRIC KEY (EKMSampleASYKey).
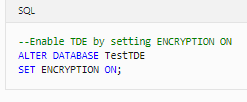
 11. Encrypt the test database. Enable TDE by setting ENCRYPTION ON.
